I imagine there already are many posts on the internet on how to paint your interior walls. But because it seems like a lot of people out there are still just splashing paint on their walls, I wanted to post another article on this. The thing about painting is that it isn't hard to do (not at home anyway), and it doesn't take a lot of effort to do it right. All you have to do is follow a few basic steps and it will seem like it was done by a pro.
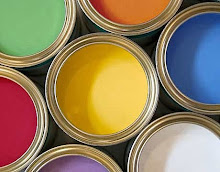
First thing you have to keep in mind is that you have to start off prepared, make sure you have made the right choice in the quality (and color) of your paint. Yes, lots of times there are promotions and special actions on different kinds of paints and sometimes they really are worth it, but even so often you are buying bad quality goods. Sometimes, paying a little bit more pays off. What would you rather have, looking at a beautiful wall for a few years more or having to repaint everything a few times over, think about this...
Apart from the paint, the tools you are working with are also important, buy good quality brushes, make sure you have everything you need to make your work as pleasant as possible. Also make sure that you have easy access to all of your walls in the room that your working in. If there's a lot of furniture, just cover them up with old blankets and pull them away from the walls just enough so you can put your ladder in between.
Cover up the floor, even if you are a clean worker, I would suggest covering up the floor because you never know, accidents do happen.
This is what you do; first of all take a good look at your wall, are there a lot of cracks, big or small... If so, then go on and remove all that comes loose, poke around even in the little cracks, everything that comes of by itself will fall off eventually. It will save you time, if you don't do this all those pieces might get stuck in your paint afterwards and imagine removing all of that dirt from your paint roller. While your at it, take your pallet knife and remove all the litle speckles from previous paint jobs or badly filled up holes.
After you're done cleaning up the wall, fill up all the holes with polyfilla interior filler, let this dry up and sand the filled up peaces with sandpaper. Continue doing this until the holes are completely filled up and are as smooth as a baby's bottom :) Remember, this is the most important step.
Hint: if the cracks in your wall are really wide take some adhesive fiber optic tape and tape it onto the crack, fill this up with the polyfilla, if you don't do this, the crack may reappear afterwards.
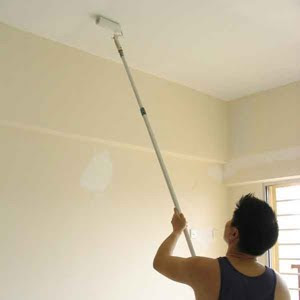
If you are painting the sealing, use the same working method for preparing it as you did for your walls, if there's a lot of sanding to do, wear a mouth mask.
Dust of your walls with a brush or a cloth and some water.
If you are only painting the ceiling (say that your walls are still good but the sealing needs a new coat of paint) you can put some adhesive tape in the corner of your walls so when you paint the ceiling, you don't also paint the corners of yours walls. make sure that the adhesive tape doesn't stick too much so the paint of your walls doesn't come off when you remove it.
If you have to paint your interior walls as well as your ceiling, you don't have to put any tape at all. You can begin by painting the ceiling, when this is done, you can paint a straight line on your walls without having to put any tape on the sailing for a straight line. This is, however, how the pros do it and not everybody has the steady hand to do this. If you're not comfortable with this technique, just get some adhesive tape that doesn't stick to much and tape it in the corners of your ceiling.
Now they are ready to be painted.
Before opening the paint bucket, make sure all the rollers, brushes, cloths (for wiping of drips) are within reach so you can continue once you begin. If it are small walls you are painting, stopping in the middle of a wall to refill your bucket or finding a brush you can't find anymore isn't such a big problem but if it's a big wall, then you will see the area you've stopped when your paint dries up. Some paint dries up faster then others but the general rule is, once you begin, you finish the wall as quick as possible, this will make a difference on large walls.
I like a rectangular paint bucket so the paint bucket raster fits in more easily, if you are working with a round paint bucket, make sure you put in a raster, don't just dip in your roller splash it on the wall, it will leave marks and you can bet on it that you can clean your floor afterwards for there will be more paint on the floor then on your walls. I can't emphasise enough to be a clean worker, not only is it more fun, but it's a lot easier too.
So fill up your bucket, put in the raster the roller and the brush and climb up your ladder. (don't forget to wipe off the paint from the original bucket so it doesn't dry up to the sides of the bucket.
Suppose you have to paint both your ceiling and your walls. This is the right method to do it... (it will take a couple of days because every layer of paint needs to dry up completely)
First of all, there is a difference between newly plastered ceilings and walls that already have a layer of paint on them. Newly plastered walls can possibly be painted with only two layers of paint but in general they will need an extra first layer of primer paint, don't use the transparent primer, us a primer that already has some white paint in it as it will cover your plaster a lot better than the transparent plaster.
So the only difference between the plastered and unplastered ceilings or walls is the extra layer of primer.
This example will be for a room with an old layer of paint already on it.
When starting with the ceiling, don't mind painting on your walls when painting the corners of your ceiling, the layers on the walls will cover this up later on, just make sure you don't leave drips or stripes of paint on your walls because, if this dries up, you will see the unevenness.
If you are right handed, start in the right hand corner of the room (left hand corner if your left handed, off course), always work in the direction of the longest side of your ceiling or wall. the next picture demonstrates this. (view it as if you were laying on your back)

Start by painting the corners off where you are standing with your paint brush, then take your roller and paint the area you can reach comfortably. Don't try to paint a very large surface in one time, it will take a lot more effort and it doesn't do you any good, small part at a time is the way to go. If you have to stretch out to much, you're over the limit. Make sure there is enough paint on your roller. Never paint too dry because first of all it makes the job a lot harder and secondly, you may miss some spots and your wall or ceiling will have nasty stripes in them when you finish the job. If you are painting with a roller with long fabric, when the fabric sticks to the roller, it's too dry, make sure the fabric has enough paint in it to stay fluffy like.
Start by making a Z like shape with your roller, then roll over in the opposite side, do this until the whole area is covered up nicely. This may sound silly but the way to paint with a roller is exactly like in the karate kid movie. You have to let the roller do the painting job for you, always finish your movement by letting the roller glide off the ceiling or wall so you don't leave any thick marks that can dry up and leave traces. Look at karate kid, he does it perfect :). Always finish your last rolls in the length of the ceiling, if you finish the stroke in the width, it may leave traces.
Now go on and move your ladder next to the part you just painted, take the piece next to it in the width of the room. Do this till you get to the other side.
When you get there, take your ladder and return to to other side off the room where you started off and paint the part next to the first part you painted. I'll explain why you can't continue the part you just finished painting.
On a small wall or ceiling, this is not too important but if you have to paint a large ceiling or wall, trust me, this will be important. The reason for getting back to the other side is that, if you don't do this, your paint will have dried up by the time you get there and if you are finishing your last coat of paint you will see lots of marks when it dries up, so be sure to work "wet on wet" as I like to call it. when painting a large wall, there is another extra trick to do this, I will explain this soon.
When you are putting on the primer or first coat of paint, don't worry too much about skipping some little part here and there, the finishing coat will cover this up. Although you want to make sure you don't leave big blobs of paint for those will dry up and leave ugly traces.
When you finish the sealing, let it dry up for at least a couple of hours, preferably the whole night.
If you put on the second coat of paint too soon, it will crackle and come off because of the fact that the first layer hasn't dried enough. If you want to go quick, do this at your own risk, but don't tell me I didn't warn you :)
So you finished your primer coating and/or your first coat of paint. The last coat you put on exactly the same way you did before only now, be extra careful that you don't skip a part, when putting on the second coat, it's more difficult to see where you have already painted. Take a step back from time to time and make sure everything has been covered. The best way to see this is during the day with natural sunlight but if you have to work in the evening or at night a spotlight will also help.
there you you, you finished painting your ceiling, wasn't that a breeze :)
Now let's get started on the walls, if your ceiling has completely dried up, as I said before, you can put some adhesive tape onto the corners to get a perfect line at the top of your walls. If you want to draw the line without the adhesive tape continue reading and I will explain how to do this.
In the same way you did with the ceiling, begin painting in the top right corner of the wall (if you're right handed). If you didn't put adhesive tape on the ceiling begin by drawing a line near the corner of the wall but don't paint too close to the corner at this point, it doesn't have to perfect for your first coat of paint, just make sure you can cover the bottom of the line easily with your roller so it doesn't leave any marks. Also paint with your brush covering the whole corner against the connecting wall. Now begin painting the first part with your roller and remember not to take on too much of a surface at once.
When you finish the first part, continue below. If you have a small wall you can go from top to bottom and repeat the process again and again, your paint will not have dried up in the meantime.
If you have a large surface to cover, take a look at the image below for the way to do this is a bit different, remember, you always need to to paint "wet on wet".

You see in the image that I'm not working from top to bottom but from top to side to bottom, covering a bigger area but still painting "wet on wet" every time. Follow this pattern for a large wall and the end result will be excellent.
When putting on your second coat and you are doing the top corner line by hand now is the time to take out your best painting skills and steady hand. Remember I said that the line for the first coat didn't have to be perfect, well, this time it does, paint over the first coat and make sure you draw a straight line all the way into the corner. If your ceiling is a bit uneven, make sure you follow a straight line even if it means leaving a bit of the wall uncovered, you won't see this with your straight line from a distance. Better to have a straight line then wanting to paint every inch close to the ceiling.
Now repeat the steps of your first coat and finish the wall. Do this for every wall in the room and make sure you finish the whole room with your last coat because else, you'll guess it by now, you will see marks if you don't.
There you go, now all you have to do is clean up, wait until the paint dries and enjoy the final result.
I hope some of you have benefited from this post and now know how to paint your interior walls if you didn't already know before.